February 22, 2013

{Simple and Easy} Achari Chana Pulao | Pickle Spiced Chickpea Rice Recipe | Pressure Cooker Recipes


If there is one kitchen gadget that I can never imagine myself without is my beloved pressure cooker. I have seen my mom use not one, but two of them simultaneously and to this day she swears by its efficiency. Same is the case with my mother in law too. I literally wake up every single morning with whistle whooshing across the kitchen till our bedroom. ;-) 

That my friends is the role of a pressure cooker played in our lives. In one word - Quintessential.

Now, when I read Jaya's post on how an cookbook author claimed that Indian-made pressure cookers are unsafe to use and tended to blow up in people’s faces. I was like - What The! That is a total exaggeration.  Nothing in this world in perfect, I agree on that but whenever I heard people telling me stories of their pressure cookers blowing up, its always the case where there was a human error. 

To err is human...Isn't it?

In order to prove the cookbook author wrong and to put across a point that pressure cookers, especially indian-made are indeed safe, Jaya has asked us to cook a dish in our cookers. Hence, today's recipe - Achari Chana Pulao a.k.a Chickpea Rice spiced with Mango Pickle. That sounds a little bizarre  but trust me it tastes wonderfully delicious and no one would believe it has achaar in it ;-). My mom especially was pleasantly surprised.

Go on, take out your pressure cookers today and try this super simple pulao for your meals.

Enjoy!

Also sending this as an entry to The Wellness Weekend and Healthy Vegan Fridays.

Doesn't that look yummi-li-cious? :-)

not just mango pickle, you can use any mixed pickle for this recipe..

my cute little 3 ltrs pressure cooker. It never looked this glamorous before ;-)

all whole spices, mango pickle, veggies and beans sauteed. next comes the rice..

out and done.. ready to be fluffed with a fork..

Achari Chickpea Pulao is ready and served..


{Recipe} Achari Chana Pulao | Pickle Spiced Chickpea Rice

Adapted loosely from Tarla Dalal 
Serves 2-3


Ingredients:

1 tbsp instant mango pickle (or any pickle on hand)
1 cup long grained (basmati) rice
1 tomato, cut in long wedges
2 tsp oil
1 tsp cumin seeds
few whole spices - I used 3 bay leaves, two star anise pieces and a piece of cinnamon stick
1 medium onion, thinly sliced
2 garlic cloves, finely minced
1 cup soaked, boiled chickpeas (any variety is fine)
1/2 tsp turmeric powder (haldi)
1/2 tsp chilli powder
1/2 tsp garam masala (optional)
salt to taste

Preparation:

Wash and soak rice for 10 to 15 minutes. Keep aside.

Note: If you are using freshly boiled beans (instead of canned or frozen) for this recipe, reserve the cooking liquid (or) just use water. 

Put 2 cups of water or cooking liquid to boil.

In the pressure cooker, heat oil. Add bay leaves, cumin seeds, star anise and cinnamon. Saute for a minute. Once they start to crackle, add sliced onions and garlic. Let them brown for few minutes.

Add chickpeas, mango pickle, tomatoes, turmeric powder, chilli powder and garam masala (if using). Saute for 3-4 minutes. Adjust salt. Then the drained rice goes innand saute for few more minutes.

Add the hot water/cooking liquid and pressure cook for 2 whistles. Allow the steam to escape before opening the lid. Lightly fluff with a fork.

Serve hot with raita on the side.


“I boiled chickpeas and also cooked the Achari Chana Pulao with my Indian pressure cooker and it didn’t blow up in my face”..:-)

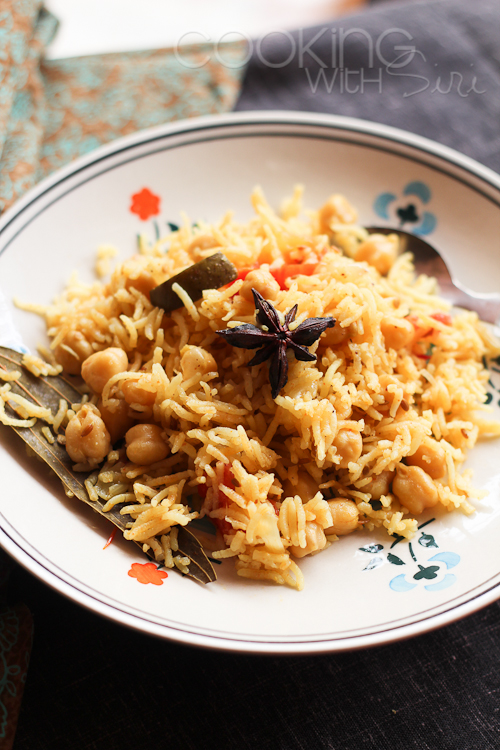
wanna grab the plate and sit down for a meal with me? :-)

This is Recipe 14 added to my 2013 Recipe Archive. Check out the rest of the recipes too!

The other day I was checking out few coupons for a pizza party at work. I have got a few good discounts here - Coupon Raja.com. Check them out and save a few bucks on your next pizza! 

*********************************************

Did you like what you just read. then Subscribe to Cooking With Siri feed  (OR)


Enter your email address and Never miss a post..


Delivered by FeedBurner

Be the first one to know what I am going to post next by "Liking" Cooking With Siri page on Facebook and follow me on twitter.


until next recipe,


February 17, 2013

{Healthy Salads} Black-Eyed Pea and Stewed Tomato Salad Recipe


"According to the Spanish proverb, four persons are wanted to make a good salad: a spendthrift for oil, a miser for vinegar, a counsellor for salt and a madman to stir it all up." John Gerard

Salads are great meals. They are quick, easy to assemble with almost anything that's readily available in the refrigerator and magical as well, especially when fresh vegetables are at their peak during the season.

But, unfortunately - "A lot of people get into what you'd call a salad rut, making the same salad over and over, or using one type of dressing for every type of leaf" says Chris Mayhew, director of marketing at Dole. (Source). I think that's partially true when we attempt to make a salad in its true definition - a green, veggies, protein and a dressing. Its fun to think out of the box and mix & match sometimes.

Today's recipe - Black-Eyed Pea and Stewed Tomato Salad is a little unconventional when it comes to how its made. You don't need always a heavy blue cheese or ranch dressing to bind everything together. Some tomato juice from the stewed tomatoes is heated up with olive oil, paprika, salt and pepper which makes up the dressing. Its just d-e-l-i-c-i-o-u-s. Black eyed peas (or any type of beans) are used for that protein kick. Best of all, its completely vegan and kid friendly. :-)

Enjoy and make some today!


peeled, stewed  canned cherry tomatoes.

boiled black eyed peas

the dressing - olive oil, tomato juice, salt and paprika


{Recipe}  Black-Eyed Pea and Stewed Tomato Salad 


Adapted from Vegetarian Times
Serves 2

Ingredients:

1 cup dried black-eyed peas (or use drained and rinsed canned peas)
1 small onion, finely diced
1 small carrot, peeled and finely diced
1 small bell pepper, finely diced
1 green onion, both white and green parts thinly sliced
4-5 stewed tomatoes along with their juice. (I used cherry tomatoes)
2 tbsp olive oil
1/4 tsp paprika (or chilli powder)
salt & black pepper - to taste
chopped cilantro/coriander leaves - for garnishing


Preparation:

How to prepare dried beans: Soak 1 cup of dried black peas for 6 to 8 hours in filtered water. Pressure cook with enough water on HIGH heat for 9-12 minutes. Let the pressure be released naturally and there you have peas ready for use. I normally cook atleast 5-6 cups and freeze them. When required, all you have to do is thaw them a bit.

In a bowl, combine black-eyed peas, onion, carrots, bell pepper, and green onions and keep aside.

Drain the can of stewed tomatoes. Coarsely chop tomatoes and add to black-eyed-pea mixture. 

In a small saucepan, warm olive oil, few tbsp of tomato juice and paprika. Bring it to a boil, turn off and pour over black-eyed-pea mixture. Stir to coat. Season with salt and pepper, if desired. Garnish with coriander leaves. Serve immediately or refrigerate. It tastes good as a cold salad too. 

Note: My canned tomatoes were quite acidic so I skipped adding any vinegar (as per original recipe) or lemon juice. Optionally you can add one of them as well.

Sending this as an entry to Lisa's My Legume Love Affair # 56 who has taken the hosting baton from Susan from this month onwards. Also to The Wellness Weekend and Healthy Vegan Fridays.

..salad is ready..who wants to eat some!...

This is Recipe 13 added to my 2013 Recipe Archive. Check out the rest of the recipes too!

*****************************************************


Did you like what you just read. then Subscribe to Cooking With Siri feed  (OR)

Enter your email address and Never miss a post..


Delivered by FeedBurner

Be the first one to know what I am going to post next by "Liking" Cooking With Siri page on Facebook and follow me on twitter.

until next recipe,


February 14, 2013

{Valentine's Day Special} Banana Blueberry Butterscotch Pudding Cake - a Step by Step Recipe


I have this habit of listening to radio while I work. With music on, my mind is more attentive, works faster and tend NOT to fall asleep. ;-) Being Valentine's day, am having an overdose of sweet, lovey-dovey songs and love stories/poems from radio listeners since morning. Pardon me, am in no mood to talk about it anymore. (I already wrote much in my last post). We all know the importance, so let me just jump right into today's recipe as that's what I am most excited about! :-)

Those heavily freckled, overripe bananas that usually take a permanent space on our cooking counters taste yum in baked goodies. Don't throw them away. Make a pudding cake for a change and treat your friends with this scrumptious dessert. Also note the ingredients list is very similar to what you would want to make pancakes. How about you switch the plans and make this pudding cake for breakfast instead? :-)

Enjoy!


...Love is in the air..

..all decked up..
Adapted from here.

Ingredients:

1 cup all purpose flour
1/2 cup blueberries (I used dried. fresh or frozen ones can be used too)
a pinch of salt
1 cup milk
3/4 cup powdered sugar
3 tsp baking powder
1 overripe banana, mashed
1/2 cup unsalted butter, melted
1 egg, lightly beaten
1 tsp vanilla extract

For topping - 1/2 cup brown sugar, 1/8 cup maple or golden syrup and 1/2 cup boiling water

Preparation:

Preheat the oven to 180°C (350°F/Gas 4). Grease the bottom of casserole dish + few ramekins or a big 2.5L baking dish. Keep aside.

In a bowl, add the mashed banana, milk, melted butter, beaten egg and vanilla extract. Whisk together until well combined. Keep aside.

Sift together - flour, salt, powdered sugar and baking powder.


Add sifted dry ingredients to the banana mixture and mix gently.

Toss blueberries as well. Pour the mixture into the greased baking dish.


For the topping, place the brown sugar, maple syrup and water in a small pot and bring to a boil. Reduce it to simmer and let it thicken a bit.

Pour few tablespoons of boiling mixture on top of the pudding and bake it for 25 to 30 minutes or until cooked through when tested with a toothpick.

Serve. I liked the cake plain and simple. You can also try with some vanilla ice cream.

..in the oven..

I couldn't wait for long to dig and eat it all! Yum! Oooh,  I simply love overripe banana in baked goodies.

I later also tried Banana Butterscotch Pudding Cake without blueberries or the brownsugar topping.
It tasted equally  delicious! :D

Before I say goodbye for today, let me share the one and ONLY gift TH gave me in all these years we have been together. :-)


This is Recipe 12 added to my 2013 Recipe Archive. Check out the rest of the recipes too!

**********************************************

Did you like what you just read. then Subscribe to Cooking With Siri feed  (OR)

Enter your email address and Never miss a post..


Delivered by FeedBurner

Be the first one to know what I am going to post next by "Liking" Cooking With Siri page on Facebook and follow me on twitter.

until next recipe,


February 10, 2013

{Valentine's Day Special} Watermelon Ginger Limeade Recipe


“Love is that condition in which the happiness of another person is essential to your own.” 
~ Robert A. Heinlein, Stranger in a Strange Land


There are different kinds of love - romantic love, selfless love, those enriching relationships which we tend to share with our parents and siblings and above all self love. Yes, loving oneself and acknowledging who we are and how we are is also a form of love which most of us ignore.

Love is also about little things like - To be happy. To be healthy. To have peace of mind. To work towards fulfillment of those cherished dreams. And we really don't need a special day to remember these. Valentine's Day personally is a time when I just pause to get my priorities right and pamper myself and loved ones around me.

Valentine's Day is also a day of color red. - red roses, red ribbons, red colored food, red heart shaped greeting cards and even red colored gadgets. An overload of red stuff I say! Going with the theme, I made a special beverage for you all - Watermelon Ginger Limeade. With just 5 ingredients (water included) one can make this in a jiffy. Forget for just Valentine's Day. This is even perfect as a refreshing drink anytime of the day. :-)

Enjoy!

This drink is perfect for any day actually, especially hot summer days maybe? 

Just few everyday ingredients and there you have it!

Couldn't just stop myself from adding all those hearts around ;-)

I am a sucker for teddy bears, did I ever tell you that? ;-)

{Recipe} Watermelon and Ginger Limeade


Serves 4
Adapted from Food and Wine

Ingredients:

4 cups cubed watermelon (rind removed and deseeded)
1/4 cup fresh lime juice
3/4 tbsp grated fresh ginger
1/4 cup water
1/8 cup sugar

Preparation:

In a small pan, combine the water, sugar and ginger and bring to a boil. Cover and simmer over low heat for 10 minutes. Strain the ginger syrup into a small bowl.

Puree the cubed watermelon in a food processor. Strain the puree through a fine sieve set over a bowl. Stir in the ginger syrup and the lime juice.

Fill glasses with ice and add the limeade. Optionally you can garnish with the melon wedges and Serve.


Cheers everybody - To Love!

This is Recipe 11 added to my 2013 Recipe Archive. Check out the rest of the recipes too!

Did you like what you just read. then Subscribe to Cooking With Siri feed  (OR)

Enter your email address and Never miss a post..


Delivered by FeedBurner

Be the first one to know what I am going to post next by "Liking" Cooking With Siri page on Facebook and follow me on twitter.

until next recipe,


February 5, 2013

{Baking} Basil Lemon Sea Salt Shortbread - a Step by Step Recipe

 
For most of our holiday potluck parties in US, at least one of us would bring a tray full of shortbread cookies/biscuits to the table. A typical shortbread consists of few basic ingredients - flour, eggs, butter, sugar/salt and/or vanilla extract. Rest all are add ons to enhance the flavor of the shortbread itself.

For today's recipe, it is important to use a good quality butter to taste at their best. A shortbread is versatile enough to be used with almost anything and today I chose ingredients such as basil, lemon zest and sea salt.

Make these easy, buttery biscuits to surprise your friends and family.

Enjoy!


Adapted from - Leite's Culinaria

Ingredients:

1 1/4 cup all-purpose flour
1/2 cup whole wheat flour
1/4 tsp salt
2 tbsp freshly grated lemon zest
1 1/2 tsp dried basil (you can use fresh basil if you wish to)
1 tsp (or more) red chilli flakes
1/2 cup unsalted butter (at room temperature)
1 large egg, lightly beaten
2 large egg yolks
2 tsp water
sea salt for sprinkling

Preparation:

1. Stir the flours, salt, lemon peel, and dried basil together in a medium bowl. Add a tsp of red chilli flakes and butter.


2. With your fingertips, rub the butter into the dry ingredients until a coarse, crumbly mixture forms. Beat the lightly beaten egg, egg yolks, and water together. Reserve 1 tablespoon of the egg mixture for brushing. Make a well in the center of the flour. Add the remaining egg mixture and blend together with your hands without kneading the dough together; the dough will look a bit crumbly.


3. Turn the dough out onto a lightly floured work surface. Knead the dough together once or twice, just until it sticks together. Press the dough into a 1-inch-thick disc, wrap in plastic film, and refrigerate until firm, about 30 minutes.

4. Preheat the oven to 350°F (175°C) and line a baking sheet with parchment paper or a nonstick baking mat. Remove the shortbread dough from the refrigerator, unwrap, and place it on a floured work surface. Press the dough into a 6-by-5-inch rectangle. With a rolling pin, roll the dough into a larger 10-by-7-inch rectangle, about 1/4 inch thick.


5. Cut the shortbread dough in half, forming two 5-by-7-inch pieces. Using a pizza wheel or sharp paring knife, cut into 1/2-inch-wide strips. Carefully place the shor tbreads on the prepared baking sheet leaving a little room between each cookie. Brush the tops with the reserved egg mixture and sprinkle a little coarse sea salt on top.

5. Bake until the shortbreads are lightly browned, about 20 minutes. Transfer to a cooling rack and serve warm or at room temperature. Store the shortbread in an airtight container at room temperature for up to 1 week.


***********************************

Did you like what you just read. then Subscribe to Cooking With Siri feed  (OR)

Enter your email address and Never miss a post..


Delivered by FeedBurner

Be the first one to know what I am going to post next by "Liking" Cooking With Siri page on Facebook and follow me on twitter.

until next recipe,


February 3, 2013

{Quick and Easy Snack Recipes} Papad Potato Rolls - a Step by Step Recipe

 
If there's anything we, as kids used to look forward to during holidays were those yummy 4 pm snacks my mom used to make. Some days it was just some fruits and a glass of bourvita and sometimes the snack ritual was more indulgent such as deep fried bhajjias, egg puffs etc.

Today's recipe -  Papad Potato Rolls are just perfect for those brunch cravings. Make these for your kids as soon as they are home and you will for sure get some happy smiles back. Would you believe, my dad especially loved these and asked us to make another batch almost immediately. These are just so scrumptious!

a perfect snack for anytime of the day!

the potato filling

Shape each portion of filling into a long roll of about the same length as the diameter of the papads. Dip the papads in water for a few seconds. Put a potato roll on the corner of each papad and roll up. 

With a string of thread, tie loosely on both the ends.

ready to be deep fried!

....until light golden brown..


Serve and Enjoy!

{Recipe} Papad Potato Rolls


Preparation Time: 30 minutes.
Cooking Time: 20 minutes.
Makes 10 rolls
Adapted from Tarla Dalal

Serving Suggestions - Mint Peanut Chutney | Basic Eggplant Chutney | Okra Raita and Mint Raita | Madras Tomato Chutney

Ingredients:

10 papads
4 potatoes, boiled
1-2 green chillies, finely chopped
1 tbsp lemon juice
1/4 cup chopped coriander (dhania)
1/2 tsp garam masala
1/2 tsp sugar
salt to taste
oil - for deep frying
few strings of thread

Preparation:

For the potato filling: In a bowl, mash the potatoes and add the green chillies, lemon juice, coriander, garam masala, sugar and salt and mix well.

Divide the potato mixture into several portions and shape each portion into a long roll of about the same length as the diameter of the papads. Dip the papads in water for a few seconds. Put a potato roll on the corner of each papad and roll up.

With a string of thread, tie loosely on both the ends. Optionally, the original recipe uses some besan paste (chickpea flour mixed with equal amount of water)  to seal the edges. But, I found this not so optimal for the filling to stay in tact while deep frying.

Deep fry in hot oil until golden brown. Remove the thread and cut into small pieces and Serve hot.


This is Recipe 9 added to my 2013 Recipe Archive. Check out the rest of the recipes too!

***********************************

Did you like what you just read. then Subscribe to Cooking With Siri feed  (OR)

Enter your email address and Never miss a post..


Delivered by FeedBurner

Be the first one to know what I am going to post next by "Liking" Cooking With Siri page on Facebook and follow me on twitter.

until next recipe,

 
Related Posts Plugin for WordPress, Blogger...