Showing posts with label Maida/All purpose flour. Show all posts

February 22, 2015

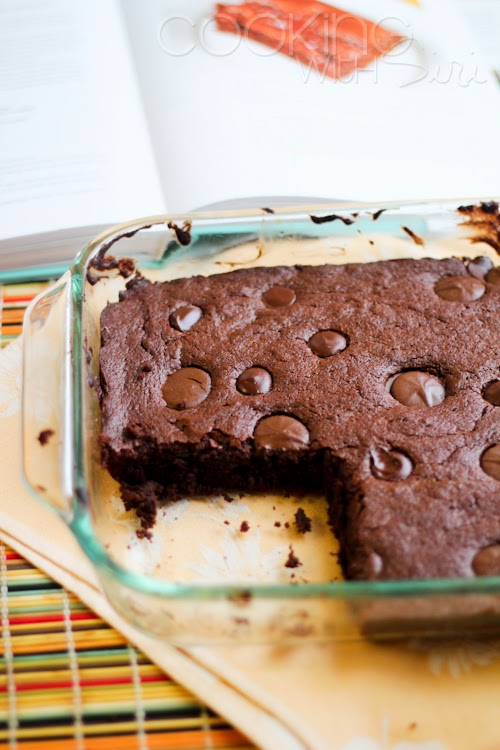
{Recipe Redux} Spectacular Chocolate Espresso Brownies


[Updated] These spectacular brownies got featured in Deccan Chronicle newspaper. Yay!

Are you a dessert person? I  am not and that might be the reason why I have only about 22 recipes blogged since seven years!. Sometimes though a rare sweet craving hits suddenly and you will see me indulge on them, guilt-free. And I have friends, nieces and a husband whose regular sweet cravings must be attended to. So, now you know why I baked these absolutely delicious brownies when the lovely bunch of people at Recipe Redux chose chocolate combo as a theme for February. These Spectacular Chocolate Espresso Brownies are fudgy in the inside and cake-y with occasional melted chocolate puddles on the outside. Also, don't you all agree Chocolate and Coffee are match made in heaven? Try it to believe it!

Spectacular Chocolate Espresso Brownies

February 11, 2015

Strawberry Cake Recipe


I was in Munich (Germany), far away from home when I first read about this recipe on Rev's blog. My immediate reaction was oh-my how beautiful does that look and next was - damn! why am I not home to bake the cake right away! Once I came back, I jumped on the first opportunity and made it - not once but twice in a row. It was that delicious. Sprinkling some sugar on top just before baking is a lovely idea to caramelize the top and to turn the strawberries into a goo-ey mess which are sneakily delicious. It is time to join the Strawberry Winter Cake Movement. Wohoo!

Nothing spells like #yum that this ridiculously easy berry cake. Trust me! :-) 

Strawberry Summer Cake
Strawberry Cake 

May 12, 2014

Amma's Recipes | G for Gavvalu | Andhra Style Sweet Shells


Amma's recipes is one such column on this blog, which is very close to my heart. These are the recipes which my mother perfected over many many years and reflects how awesome a cook she is. It is also fun to just photograph once in a while, without thinking about what and how to make a recipe, worrying whether it would turn out well or not. She Cooks, I Photograph. That is the deal. :-) If you guys have any questions, do drop in a line or comment. My mom will be more than happy to answer all of them.

A few my favorite keeper recipes from Amma's collection - [Summer Special] Instant Dosavakaya (Dosa Avakai) and Instant Mango Pickle | Eggplants stuffed with a Spice paste | Nagori Poori with Paneer Korma | Amma's 15 minute Tomato Rasam (Soup)


March 24, 2014

[Meatless Monday] Creamy Sun Dried Tomato and Spinach Macaroni 'n' Cheese | Step by Step Recipe


Learn the perfect way to make mac n cheese recipe. It is go-ey. It is creamy. It is as easy as whipping up any other pasta dish. Today's version is loaded with good stuff like spinach and has got nice tangyness from chopped sun dried tomatoes. Add anything from roasted veggies to thai curry paste as flavoring and trust me, you have got THE best comfort food ever known to mankind! :-)

November 3, 2013

Holiday Baking Recipes | Mini Plum Upside-Down Cakes


I close my eyes and I see a winter coat. Furry, soft, black my favorite color when it comes to coats. The nostalgic dream doesn't end there. We are in a big garment factory and there we are standing in front of aisles of coats. Beautiful ones getting ready to be worn for the upcoming winter. It will be my first winter in US and am secretly praying there will be snow, lots of it so that I could make a snow man.


On that day, after much prodding from my roommates I chose a woolen coat with big buttons but sadly the price was exorbitant. Not something I could afford with my meager salary from working at our University food court. But my heart pleads to go for it...and I did. I was a proud owner of my first ever black furry coat. For many many winters after that, I remember digging my mitten-covered hands into its pockets and walking on snow filled streets. Many coats came later that but the memory of shopping for my first one is always special. :-)


Just like in the 90's, I am still obsessed with fresh or dried aloo bukhara. This ruby colored fruit is from plum/prune family and is a bit tart + sweet to taste. Biting into it takes me back to my grandmom's house where she used to bring home these luscious fruits every time they are in season. Few months ago, a good friend of my dad sent us a bag full of freshly harvested fruit from his backyard. Resisting the urge to eat them right way and making the usual jams or chutneys, I made few upside down mini cakes with them which turned out to be super moist and delicious. :-)


Mini Plum (Aloo Bukahra) Upside Down Cakes

Since the fruit is pre-cooked in the sugar syrup before hand, it becomes slightly mushy once taken out of the ramekins. But it tastes yumm nonetheless and the fine balance of flavors made the effort well worth it. Any other firm seasonal fruit available on hand can be easily substituted in this recipe. 

Makes 6 mini cakes + 3-4 cup cakes

Ingredients:

For the cake batter:

2 cups all purpose flour
3/4 cup softened unsalted butter
1 cup sugar
1 tsp baking powder
1/2 tsp salt
2 eggs
2 tsp vanilla

For the topping:

1 tbsp unsalted butter
2 tbsp sugar
1 cup plum wedges

Preparation:

1. Melt a tbsp of butter, sugar and add plum wedges. Mix well until they are even coated and cook for 2 to 3 mins. Turn off heat.


2. Sift together flour, baking powder and salt. Whisk to combine. In a mixing bowl, cream butter and sugar until fluffy. Add eggs and vanilla.

3. Beat well for 2 to 3 mins on medium speed using electric mixer or whisk rigorously with hand.


4. Add flour mixture half cup at-a-time and Mix everything until just combined.

5. Preheat oven to 350 F or 180 C. Grease ramekins with butter and place a layer of fruit at the bottom. Top with few spoonfuls of cake batter and evenly distribute it.


6. Place these ramekins on a baking sheet and bake for 25-30 minutes until golden brown and a tooth pick inserted in the center comes out clean. Allow to cool for a 5 to 10 minutes. Gently invert each ramekin and unmould the cakes. Serve.


I had just a few spoonfuls of cake batter and plum wedges left. I applied the same technique of layering the fruit at the bottom, topping with batter and baked for 8 to 10 mins until a tooth pick inserted came out clean.  These upside-down cupcakes I must tell you were too adorable to eat. :-)


This is Recipe 63 added to 2013 Recipe Archive. Check out the rest of the recipes too.

**********************************************

Did you like what you just read. then Subscribe to Cooking With Siri feed  (OR)

Enter your email address and Never miss a post..


Delivered by FeedBurner

Be the first one to know what I am going to post next by "Liking" Cooking With Siri page on Facebook and follow me on twitter.

until next recipe,


October 29, 2013

Halloween Baking Ideas | Easy Hoot Owl Cookies - Step by Step Recipe


The season of festivities has already begun here in India (Dussehra + Deepavali) and in US (Halloween + Thanksgiving + Christmas). While I was US, October brought two things - lots of snow and the exuberant holiday spirit. It was very hard to give it a miss and not get sucked right into it. I never wore a Halloween costume myself but I have seen many friends who used to start their planning on what to wear and whom to scare with such gusto.

Hoot Owl Cookies
Now that I am staying far far away and terribly missing them, I made a batch of hoot owl cookies, right at the very last minute. I had all these plans to write about a cake recipe today but the nostalgia of celebrating couple of Halloweens with my friends back in US got the better of me. :-)

The hardest part of this super fun cookie recipe is the wait of at least 2 hours for the dough to set a bit. Other than that, it is a real breeze to make these and store in an air tight container. I have been munching all day on these and my 4 month old little nephew got real excited looking at them. Make some and enjoy this year's Halloween with friends and family.

Do I look scaryyyy?


Easy Hoot Owl Cookies

Adapted for Taste of Home Cookbook
Makes around 12 owl cookies
Prep Time: 25 mins + chilling
Cook Time: 10 to 13 mins

Ingredients

2-1/2 cups maida/all-purpose flour
3/4 cup butter, softened
1 cup sugar
1 egg
1 tsp vanilla extract
2 tsp baking powder
1/4 teaspoon salt
2 tbsp cocoa powder (original recipe used 1 ounce unsweetened chocolate, melted)
3 tbsp water
1/4 tsp baking soda
M & M's (or Gems)
few whole cashews

Preparation:

1. In a bowl, cream butter and sugar until fluffy. Beat in egg and vanilla.

2. Sift together flour, baking powder and salt; add 1 cup at a time to the creamed mixture.

3. Remove two-thirds of the dough; roll into a square on plastic wrap. Set aside.


4. Combine together cocoa powder, baking soda and little water.

5. Beat the cocoa mixture into remaining dough. Shape into an cylindrical log.

6. Place chocolate log at one end of the square and roll up. Pinch seams together. Wrap in plastic wrap. Refrigerate for at least 2 hours.


7. Unwrap dough and cut into slices. To form owl's face, place two slices side by side on a lightly greased or parchment covered baking sheet. Pinch dough at the top of the circles to form ears. Place M&M's in the center of each circle for eyes. Place a cashew in the center of the face for the beak.

8. Bake at 350° (or 180 C) for 10 to 13 minutes or until edges are lightly browned. Cool for 2 minutes before removing to a wire rack.


Who is more cuter - my nephew or the little owl?


This is Recipe 62 added to 2013 Recipe Archive. Check out the rest of the recipes too.

**********************************************

Did you like what you just read. then Subscribe to Cooking With Siri feed  (OR)

Enter your email address and Never miss a post..


Delivered by FeedBurner

Be the first one to know what I am going to post next by "Liking" Cooking With Siri page on Facebook and follow me on twitter.

until next recipe,


August 25, 2013

My blog turns 6 years old! | Sweet Coconut Bread [Step by Step Recipe]


Oh boy! What a wonderful feeling it is to celebrate 6 years of non-stop food blogging. I really didn't have a clue what I was getting myself into when I started this blog on a hot Sunday afternoon way back in 2007. I was neither a good cook nor good photographer then. I was nothing. Just someone who was tired of waiting, someone who was hoping something nice would happen in her life.


July 20, 2013

Eggless White Chocolate Chip Cookies Recipe


“The rain to the wind said, You push and I'll pelt.'
They so smote the garden bed, That the flowers actually knelt,
And lay lodged--though not dead, I know how the flowers felt.”  ~ Robert Frost

Cookies with Yogi Chai Tea

May 20, 2013

How to make Fresh Egg Pasta (Step-by-Step Recipe) + Orecchiette, the easy way


“Life is a combination of magic and pasta.”  Federico Fellini

..and I wanted to make some of my own pasta for a really long time, though a box of dried penne, spaghetti or farfalle is a beloved staple in my pantry. I love them so much that every time I watch a food or travel-based show based on Italy, I imagine myself rolling out a sheet of dough and making long pasta ribbons out of it. Such was my craziness!

After reading quite a few blog posts on the internet and flipping through Mark Bittman's book - How to Cook Everything Vegetarian cover to cover, last weekend I ventured into the kitchen to make atleast two kinds of fresh pasta. By the end of the day I was super thrilled with the fantastic results. Here I am sharing the first batch of pasta I made - Orecchiette, the easy way.

Enjoy!


April 16, 2013

{Simple and Easy Baking} Peanut Butter Cookies


I think am one of the very few out there who conveniently despised the taste of peanut butter all of childhood. My ex-roomie always had a super big jar of peanut butter from Costco during my graduation days right on the top of our fridge and I never, ever was even tempted to have some. Such was the dislike.

Fast forward..few days ago..when I was hunting down the aisles for a particular brand of jam, I literally stopped on my heels when a bottle of peanut butter just tumbled down into my shopping cart. I dutifully was about to put it back, that's when my sister asked - Why do you hate it? I didn't have an answer for her. That's when I decided to give this a try. Not as a the very popular peanut butter and jelly sandwich, am not yet ready for that. As a soft, chewy cookie may be? That's today's recipe - Peanut Butter Cookies.

Enjoy!


{Recipe} Peanut Butter Cookies


Adapted from Saveur
Makes about 2 dozen cookies

Ingredients:

1.5 cups maida/all purpose flour
1 tsp baking powder
1/2 tsp salt (avoid if using salted butter)
1 cup sugar
6 tbsp unsalted butter, softened
1 eggs
1/2 cup peanut butter
1 tsp vanilla extract

Preparation:

1. Heat oven to 350 F or 180 C. Sift together flour, baking powder and salt in a bowl.  Set aside. Beat butter and sugar together in a bowl with a hand mixer until pale and fluffy, about 3-5 minutes. Add egg, beating well after each, until smooth. Add peanut butter and vanilla. Beat until smooth.


....peanut butter...

...vanilla essence...
 2. Add flour mixture beat until combined using a spatula.


3. Using a tablespoon, portion out dough and roll into balls; place 2″ apart on parchment paper, lined on a baking sheet. Using a fork, press tines over balls in a crosshatch pattern to flatten.


4. Bake, rotating baking sheets halfway through cooking, until golden brown, about 12-13 minutes.


Serve with some chai or just plain milk. Store the remaining in an air tight container. 

..You want one?..


I especially enjoyed these with a glass of cold milk on a hot summer day!


This is Recipe 27 added to my The 100 Recipe Challenge for Year 2013. Check out the rest of the recipes too!

**********************************************
Did you like what you just read. then Subscribe to Cooking With Siri feed  (OR)

Enter your email address and Never miss a post..


Delivered by FeedBurner

Be the first one to know what I am going to post next by "Liking" Cooking With Siri page on Facebook and follow me on twitter.

until next recipe,


February 5, 2013

{Baking} Basil Lemon Sea Salt Shortbread - a Step by Step Recipe

 
For most of our holiday potluck parties in US, at least one of us would bring a tray full of shortbread cookies/biscuits to the table. A typical shortbread consists of few basic ingredients - flour, eggs, butter, sugar/salt and/or vanilla extract. Rest all are add ons to enhance the flavor of the shortbread itself.

For today's recipe, it is important to use a good quality butter to taste at their best. A shortbread is versatile enough to be used with almost anything and today I chose ingredients such as basil, lemon zest and sea salt.

Make these easy, buttery biscuits to surprise your friends and family.

Enjoy!


Adapted from - Leite's Culinaria

Ingredients:

1 1/4 cup all-purpose flour
1/2 cup whole wheat flour
1/4 tsp salt
2 tbsp freshly grated lemon zest
1 1/2 tsp dried basil (you can use fresh basil if you wish to)
1 tsp (or more) red chilli flakes
1/2 cup unsalted butter (at room temperature)
1 large egg, lightly beaten
2 large egg yolks
2 tsp water
sea salt for sprinkling

Preparation:

1. Stir the flours, salt, lemon peel, and dried basil together in a medium bowl. Add a tsp of red chilli flakes and butter.


2. With your fingertips, rub the butter into the dry ingredients until a coarse, crumbly mixture forms. Beat the lightly beaten egg, egg yolks, and water together. Reserve 1 tablespoon of the egg mixture for brushing. Make a well in the center of the flour. Add the remaining egg mixture and blend together with your hands without kneading the dough together; the dough will look a bit crumbly.


3. Turn the dough out onto a lightly floured work surface. Knead the dough together once or twice, just until it sticks together. Press the dough into a 1-inch-thick disc, wrap in plastic film, and refrigerate until firm, about 30 minutes.

4. Preheat the oven to 350°F (175°C) and line a baking sheet with parchment paper or a nonstick baking mat. Remove the shortbread dough from the refrigerator, unwrap, and place it on a floured work surface. Press the dough into a 6-by-5-inch rectangle. With a rolling pin, roll the dough into a larger 10-by-7-inch rectangle, about 1/4 inch thick.


5. Cut the shortbread dough in half, forming two 5-by-7-inch pieces. Using a pizza wheel or sharp paring knife, cut into 1/2-inch-wide strips. Carefully place the shor tbreads on the prepared baking sheet leaving a little room between each cookie. Brush the tops with the reserved egg mixture and sprinkle a little coarse sea salt on top.

5. Bake until the shortbreads are lightly browned, about 20 minutes. Transfer to a cooling rack and serve warm or at room temperature. Store the shortbread in an airtight container at room temperature for up to 1 week.


***********************************

Did you like what you just read. then Subscribe to Cooking With Siri feed  (OR)

Enter your email address and Never miss a post..


Delivered by FeedBurner

Be the first one to know what I am going to post next by "Liking" Cooking With Siri page on Facebook and follow me on twitter.

until next recipe,


January 7, 2013

{Delicious and Moist} Apple Cinnamon Buttermilk Cake Recipe


“Love is like a good cake; you never know when it's coming, but you'd better eat it when it does!” 
~ C. JoyBell C.


Baking a Cake. Well, I never did it until a few years ago. That's such an amusing thing to admit, now that I am about to share a cake recipe with you all today. You know, my mom was a very conventional cook who stuck to making only traditional, andhra food all our childhood. Our daily dose of bread, cakes, egg puffs (our childhood favorite) came from a local bakery and honestly we never cared for how exactly its made. It was delicious nevertheless. That is it. The story of bread or in fact baking ends there.

Then, I moved to US for my Masters and learnt more things I could have ever imagined during my short stint over there. When we first moved to an apartment in New York, much to my surprise a whole bunch of stuff came with it - a fridge, a micro wave, carpeted floors and an oven. I always wondered what would people do with it. That was my level of ignorance! ;-). Then, just out of curiosity I googled and slowly yet steadily learnt my way through about how to use it. It was an interesting process which lot more of burnt cakes you can imagine and smoke alarms that fire off almost every single time. It was embarrassing and exhilarating at the same time. With each failed attempt, I knew I was getting closer, not knowing where exactly I want to reach. Luckily enough, I took a part time job in our univeristy food court and there I was given the task of making pizza, right from scratch. I kneaded, stretched dough using all my muscle power, grated cheese, chopped onion, tomatoes, bell pepper and sometimes meat too. That's how I learnt how to make a my first pizza! (Wish the world knew about  Jim Lahey's recipe No Knead Pizza by then.)

My first cake (after many failed attempts) which I published here on the blog was - Blue Agave Cake with Nuts, Ginger and Lemon (sugar less and makes use of agave nectar) and I still remember its taste. Things were a little control by then and I started to trust my baking skills. The next was a Tutti Frutti Cake, I baked for my sister's birthday. My aunts, my uncles simply loved it. That's when I made a promise to myself that I will bake a cake for birthdays of each of my loved ones.

Must Read - Monica's evocative article on how she baked a cake. - The Ghost of Cakes.


It was my mom's birthday at the end of December and to celebrate the abundance of apples which were readily available in our local markets, I made an Apple Cinnamon Buttermilk Cake for her.


Apple and Cinnamon are like a match made in heaven. A bowl of oatmeal to a doughnut, this combination never fails to impress. If you are unsure of where to start for learning how to bake a cake, I recommend this recipe.  The step by step pictures below should help you a great deal about the process.

Enjoy!

{Recipe} Apple Cinnamon Buttermilk Cake

Adapted from Pinch My Salt
Serves 6-7 
Start to Finish: Less than 1 hour.

Ingredients:

1 apple, chopped into thin slices
1/4 cup chocolate chip cookies
1 cup all purpose flour (maida)
1 egg
1/2 cup buttermilk
1/2 tsp baking powder
1/2 tsp baking soda
1/2 tsp cinnamon
1/4 tsp salt (skip if using salted butter)
4 ttbsp unsalted butter (1/2 stick), at room temperature
2/3 cup sugar

For topping - 1 tsp brown sugar + few pinches of cinnamon powder

Preparation:

Step 1: In a medium bowl, whisk together flour (sift if there are lumps), baking soda, baking powder, cinnamon, and salt. Set aside.  In a separate bowl, beat butter and sugar with an electric mixer until pale and fluffy for about 2 minutes.  Add vanilla and egg and beat well.


Step 2: Preheat oven to 400 F or 200 C. Butter generously the bottom of a cake pan (9 inch or 8 inch) and sprinkle flour. Alternatively, you can place a parchment paper in the bottom of the pan and then pour the batter evenly.

Step 3: With the mixer on low speed, beat in 1/3 of the flour mixture. Add half the buttermilk and continue beating on low speed until incorporated.  Scraping down sides of bowl as necessary, beat in another 1/3 of flour mixture then remaining buttermilk.  Finally beat in the last 1/3 of the flour mixture until just combined.


Step 4: Add in the chocolate chips into the cake batter. Scrape batter into the prepared cake pan, smoothing the top with a spatula.  Scatter apple slices evenly over the top of the cake batter then sprinkle with brown sugar and cinnamon.


Step 5: Bake until cake is golden brown and a toothpick when inserted in the center comes out clean. It will take around 25 to 30 minutes.  Cool in the pan for ten minutes, then turn out onto a wire rack to cool until warm. Invert onto a plate.


Serve as-is or with whipped cream on side. 


Did you like what you just read. then Subscribe to Cooking With Siri feed  (OR)

Enter your email address and Never miss a post..


Delivered by FeedBurner

Be the first one to know what I am going to post next by "Liking" Cooking With Siri page on Facebook and follow me on twitter.


until next recipe,

November 22, 2012

Vegan Potato Latkes (Potato Pancakes) Recipe

 
The concept of Thanksgiving was alien to me until a few years ago. When I went to US to study, it was quite intriguing and fun to just watch, with how much gusto people over there celebrate their holidays from now onwards till New Year. Many meticulously plan their Thanksgiving dinners ,looking forward to  entertain their out-of-town relatives and get into the spirit of the season. I have seen that most of them are quite nervous about how their family would react to the food that's served!. ;-).

I personally don't celebrate Thanksgiving as a holiday, but I love the spirit of it. As I said in my last year's post, where I made some Rosemary Cheese Biscuits - "Its a time for remembering, cherishing and being thankful for all the wonderful things one has been blessed with". Indeed am surrounded with tons of positive minded people who became pillars of strength during my good and bad times!

a painting made by a little girl Kavita from Vaidehi Ashram.
This year I am particularly thankful to the wonderful readers of this blog. Thank you for being a part of my little journey, reading what I write and just supporting the cause I truly believed in. It still feels like a dream that I was able to raise about 4.5 Lakh Rupees through two Fund Drives this year and helped those little girls at the Ashram.

Thank YOU for having faith in me and trusting me. On this happy occasion of Thanksgiving, I am so super excited to announce that the entire amount of Rs 3,20,107 raised from the Fund Drive held in February 2012 has been spent for the children of Vaidehi Ashram with the recent of cheque of Rs 50,700 as their school fees. Click here for more details on how the money was spent. Words cannot describe how happy they are for the love and support you guys have showered on them.

Our responsibility to give the girls a better future doesn't end here. There is a constant need of funds for Kid's Education Fund (Vidya Nidhi) as every month more than 25,000 Rupees has to be paid as school fees for about 100+ school going girls. If you wish to lend a helping hand to the girls at the Ashram, please feel free to send me an email at - info[dot]siri[at]gmail[dot]com. I will be happy to coordinate in any which way you want to contribute. Thanks in advance. :-)


For most of the Thanksgiving meals must-have is a potato dish on the menu. Hence, here is a super simple, quick to make recipe - Vegan Potato Latkes (Potato Pancakes). Serve it with any kind of accompaniment or just as-is. These taste best when served warm.

potato pancakes on the griddle!


Thanksgiving Recipe Ideas:

Jalapeno Corn Bread Muffin with Easy Vegetarian Bean Chilli Recipe
Chocolate Coffee Almond Blondies
Indian Tater Tots
Rosemary Cheese Biscuits 
Oven-Fried Sweet Potatoes with Cilantro Gremolata 
Thanksgiving Meal: Baked Broccoli Rice Supreme, and Stuffed Bell Peppers 

{Recipe} Vegan Potato Latkes (Potato Pancakes) 

Makes around 10 small pancakes

Adapted from Vegnews

Ingredients:

2 big potatoes (~ 500 gms)
1 small onion, grated
1/4 cup all purpose flour
few tablespoons of chopped coriander/cilantro
salt -to taste
(Optional spices) - 1 tsp cumin powder, 1/2 tsp chilli powder, 1 tsp coriander powder
few tbsp of oil, for shallow frying.

Preparation:

1. Peel and grate the potatoes. Squeeze out excess liquid from the potatoes. Place the grated potatoes in a bowl and add grated onion, flour, cilantro, salt, cumin powder, chilli powder and coriander powder. Mix well. Don't add any water.

2. In a skillet, add a tbsp of oil. Take a heaping tablespoon of batter and flatten it before gently placing it in hot oil. Make three or four more potato pancakes and add to skillet without crowding pan. Cook on low-medium heat until golden brown on both sides.

3. Repeat with remaining potato mixture, adding more oil as necessary. Remove cooked potato pancakes to paper towels to drain excess oil. Transfer to an ovenproof platter (if serving a little later) and keep warm in oven until all pancakes are cooked. Serve.


Wishing you all a very Happy Thanksgiving 2012.


***Giveaways for this Holiday Season***

Last Date: November 30th 2012

{Holiday Giveaway 1} A chance to win Canon Powershot Camera giveaway (Open for Indian Residents only ) - Try your luck here.


{Holiday Giveaway 2} Win $25 Amazon and Olive Garden giftcards. (Open for everybody) - For more details, Click here.


Today is Day 22 of my NaBloPoMo challenge. Check out all of the posts previously published here.


Did you like what you just read. then Subscribe to Cooking With Siri feed  (OR)

Enter your email address and Never miss a post..


Delivered by FeedBurner

Be the first one to know what I am going to post next by "Liking" Cooking With Siri page on Facebook and follow me on twitter.

until tomorrow,


Related Posts Plugin for WordPress, Blogger...