March 5, 2013

{Simple and Easy} Mario Batali's Tortilla Española | Spanish Omelette with Potatoes, Eggs and Spinach | Spanish Tortilla Recipe

 
Everybody has a dream.

...and mine is to go on a trip to Europe one day. It is a continent with such diversity in terms of weather, people & their living, architecture and of course food. Just to mention a few, think of a french baguette, italian pasta, neapolitan pizza, polish pierogi or a spanish tapas. yumm! Isn't it. I wish to taste and savor each one of them!

On my bucket list is also to view the magnificent piazzas in Rome, drive through those rustic, country-side roads of Tuscany (Italy), experience a day shopping (if my wallet permits) in fashion capital Paris, catch a glimpse of Eiffel Tower with a stopover at The Louvre, hit the bars in london and end with a quiet Spanish meal with tons of paella and tortillas. The very thought of it is so exhilarating and brings happy thoughts into my mind & tummy.

Do you have a dream too? I would love to know all about it.


I am not sure if this dream of mine will become a reality in near future, so I made myself Mario Batali's Tortilla Española for lunch today. Its basically a spanish omelet with eggs, onions and potatoes. I added some spinach as well. This dish is so easy to put together and the end result is so satisfying and delicious. Not just breakfast, this tortilla can be served as a wholesome lunch, brunch, snack or dinner.

This is indeed the best of all omelets! :-)

Enjoy!


{Recipe} Tortilla Española | Spanish Omelette with Potatoes, Eggs and Spinach


Adapted from Mario Batali's Recipe on Food and Wine
Serves 2-3 

Ingredients:

3 eggs
2 potatoes, washed, peeled and thinly sliced
1 bunch of spinach, washed and chopped
1 medium onion, thinly sliced
salt and pepper - to taste
few red chilli flakes

Preparation:

1. Heat olive oil in a flat bottomed pan and saute onions until they are translucent. Spread potatoes as one layer. Cook over moderate heat, stirring occasionally  until the potatoes and onion are tender but not browned, about 10-15 minutes.

2. Add chopped spinach and lightly season with salt & pepper.


3. In a bowl, lightly beat the eggs and add red chillie flakes, little salt and pepper.

4. Scrape the potato-onion-spinach mixture into the bowl and gently fold in everything.


5. Preheat oven to 180 C or 350 F. Grease a baking pan with some olive oil and evenly spread the egg mixture. Bake for about 15 to 20 minutes until the tortilla is set and eggs are completely cooked.


Transfer the spanish omelet onto a plate and cut into wedges. Serve alongside with some bread, ketchup, any spread or enjoy as-is.

Note: The tortilla can stand at room temperature for 3 hours before serving.


This is Recipe 15 added to my 2013 Recipe Archive. Check out the rest of the recipes too!

*********************************************

Did you like what you just read. then Subscribe to Cooking With Siri feed  (OR)

Enter your email address and Never miss a post..


Delivered by FeedBurner

Be the first one to know what I am going to post next by "Liking" Cooking With Siri page on Facebook and follow me on twitter.


until next recipe,

February 22, 2013

{Simple and Easy} Achari Chana Pulao | Pickle Spiced Chickpea Rice Recipe | Pressure Cooker Recipes


If there is one kitchen gadget that I can never imagine myself without is my beloved pressure cooker. I have seen my mom use not one, but two of them simultaneously and to this day she swears by its efficiency. Same is the case with my mother in law too. I literally wake up every single morning with whistle whooshing across the kitchen till our bedroom. ;-) 

That my friends is the role of a pressure cooker played in our lives. In one word - Quintessential.

Now, when I read Jaya's post on how an cookbook author claimed that Indian-made pressure cookers are unsafe to use and tended to blow up in people’s faces. I was like - What The! That is a total exaggeration.  Nothing in this world in perfect, I agree on that but whenever I heard people telling me stories of their pressure cookers blowing up, its always the case where there was a human error. 

To err is human...Isn't it?

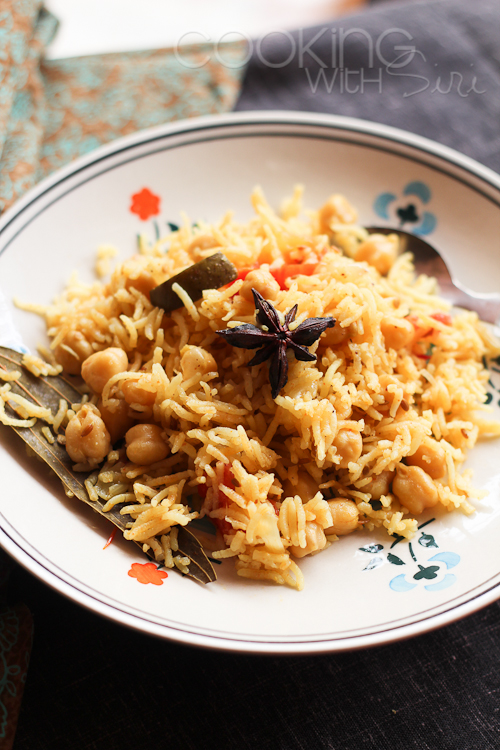
In order to prove the cookbook author wrong and to put across a point that pressure cookers, especially indian-made are indeed safe, Jaya has asked us to cook a dish in our cookers. Hence, today's recipe - Achari Chana Pulao a.k.a Chickpea Rice spiced with Mango Pickle. That sounds a little bizarre  but trust me it tastes wonderfully delicious and no one would believe it has achaar in it ;-). My mom especially was pleasantly surprised.

Go on, take out your pressure cookers today and try this super simple pulao for your meals.

Enjoy!

Also sending this as an entry to The Wellness Weekend and Healthy Vegan Fridays.

Doesn't that look yummi-li-cious? :-)

not just mango pickle, you can use any mixed pickle for this recipe..

my cute little 3 ltrs pressure cooker. It never looked this glamorous before ;-)

all whole spices, mango pickle, veggies and beans sauteed. next comes the rice..

out and done.. ready to be fluffed with a fork..

Achari Chickpea Pulao is ready and served..


{Recipe} Achari Chana Pulao | Pickle Spiced Chickpea Rice

Adapted loosely from Tarla Dalal 
Serves 2-3


Ingredients:

1 tbsp instant mango pickle (or any pickle on hand)
1 cup long grained (basmati) rice
1 tomato, cut in long wedges
2 tsp oil
1 tsp cumin seeds
few whole spices - I used 3 bay leaves, two star anise pieces and a piece of cinnamon stick
1 medium onion, thinly sliced
2 garlic cloves, finely minced
1 cup soaked, boiled chickpeas (any variety is fine)
1/2 tsp turmeric powder (haldi)
1/2 tsp chilli powder
1/2 tsp garam masala (optional)
salt to taste

Preparation:

Wash and soak rice for 10 to 15 minutes. Keep aside.

Note: If you are using freshly boiled beans (instead of canned or frozen) for this recipe, reserve the cooking liquid (or) just use water. 

Put 2 cups of water or cooking liquid to boil.

In the pressure cooker, heat oil. Add bay leaves, cumin seeds, star anise and cinnamon. Saute for a minute. Once they start to crackle, add sliced onions and garlic. Let them brown for few minutes.

Add chickpeas, mango pickle, tomatoes, turmeric powder, chilli powder and garam masala (if using). Saute for 3-4 minutes. Adjust salt. Then the drained rice goes innand saute for few more minutes.

Add the hot water/cooking liquid and pressure cook for 2 whistles. Allow the steam to escape before opening the lid. Lightly fluff with a fork.

Serve hot with raita on the side.


“I boiled chickpeas and also cooked the Achari Chana Pulao with my Indian pressure cooker and it didn’t blow up in my face”..:-)

wanna grab the plate and sit down for a meal with me? :-)

This is Recipe 14 added to my 2013 Recipe Archive. Check out the rest of the recipes too!

The other day I was checking out few coupons for a pizza party at work. I have got a few good discounts here - Coupon Raja.com. Check them out and save a few bucks on your next pizza! 

*********************************************

Did you like what you just read. then Subscribe to Cooking With Siri feed  (OR)


Enter your email address and Never miss a post..


Delivered by FeedBurner

Be the first one to know what I am going to post next by "Liking" Cooking With Siri page on Facebook and follow me on twitter.


until next recipe,



February 17, 2013

{Healthy Salads} Black-Eyed Pea and Stewed Tomato Salad Recipe


"According to the Spanish proverb, four persons are wanted to make a good salad: a spendthrift for oil, a miser for vinegar, a counsellor for salt and a madman to stir it all up." John Gerard

Salads are great meals. They are quick, easy to assemble with almost anything that's readily available in the refrigerator and magical as well, especially when fresh vegetables are at their peak during the season.

But, unfortunately - "A lot of people get into what you'd call a salad rut, making the same salad over and over, or using one type of dressing for every type of leaf" says Chris Mayhew, director of marketing at Dole. (Source). I think that's partially true when we attempt to make a salad in its true definition - a green, veggies, protein and a dressing. Its fun to think out of the box and mix & match sometimes.

Today's recipe - Black-Eyed Pea and Stewed Tomato Salad is a little unconventional when it comes to how its made. You don't need always a heavy blue cheese or ranch dressing to bind everything together. Some tomato juice from the stewed tomatoes is heated up with olive oil, paprika, salt and pepper which makes up the dressing. Its just d-e-l-i-c-i-o-u-s. Black eyed peas (or any type of beans) are used for that protein kick. Best of all, its completely vegan and kid friendly. :-)

Enjoy and make some today!


peeled, stewed  canned cherry tomatoes.

boiled black eyed peas

the dressing - olive oil, tomato juice, salt and paprika


{Recipe}  Black-Eyed Pea and Stewed Tomato Salad 


Adapted from Vegetarian Times
Serves 2

Ingredients:

1 cup dried black-eyed peas (or use drained and rinsed canned peas)
1 small onion, finely diced
1 small carrot, peeled and finely diced
1 small bell pepper, finely diced
1 green onion, both white and green parts thinly sliced
4-5 stewed tomatoes along with their juice. (I used cherry tomatoes)
2 tbsp olive oil
1/4 tsp paprika (or chilli powder)
salt & black pepper - to taste
chopped cilantro/coriander leaves - for garnishing


Preparation:

How to prepare dried beans: Soak 1 cup of dried black peas for 6 to 8 hours in filtered water. Pressure cook with enough water on HIGH heat for 9-12 minutes. Let the pressure be released naturally and there you have peas ready for use. I normally cook atleast 5-6 cups and freeze them. When required, all you have to do is thaw them a bit.

In a bowl, combine black-eyed peas, onion, carrots, bell pepper, and green onions and keep aside.

Drain the can of stewed tomatoes. Coarsely chop tomatoes and add to black-eyed-pea mixture. 

In a small saucepan, warm olive oil, few tbsp of tomato juice and paprika. Bring it to a boil, turn off and pour over black-eyed-pea mixture. Stir to coat. Season with salt and pepper, if desired. Garnish with coriander leaves. Serve immediately or refrigerate. It tastes good as a cold salad too. 

Note: My canned tomatoes were quite acidic so I skipped adding any vinegar (as per original recipe) or lemon juice. Optionally you can add one of them as well.

Sending this as an entry to Lisa's My Legume Love Affair # 56 who has taken the hosting baton from Susan from this month onwards. Also to The Wellness Weekend and Healthy Vegan Fridays.

..salad is ready..who wants to eat some!...

This is Recipe 13 added to my 2013 Recipe Archive. Check out the rest of the recipes too!

*****************************************************


Did you like what you just read. then Subscribe to Cooking With Siri feed  (OR)

Enter your email address and Never miss a post..


Delivered by FeedBurner

Be the first one to know what I am going to post next by "Liking" Cooking With Siri page on Facebook and follow me on twitter.

until next recipe,


Related Posts Plugin for WordPress, Blogger...