


Showing posts with label Corn Flour. Show all posts
Showing posts with label Corn Flour. Show all posts



March 19, 2013
{Easy Summer Recipes} Homemade Fruit on the Bottom Yogurt (using Plums)
One of the many fun activities during my weekend grocery shopping while I was in US was strolling through the endless rows of products right from cereal to various kinds of sauces to fresh, exotic vegetables. Most of the times, I was on tight budget, so once the contents from my pre-made shopping list are in my cart, all I used to do was gape and make a mental note of stuff-I-want-to-buy-once-I-have-tons-of-dollars. You see, shopping frugally was never my cup of tea. I was desired for more. My sinister heart would coax me to buy much more than I wanted but my rational mind would stop me every single time!.
During such escapades, I discovered these down under yogurt cups from an australian company called Wallaby. I tried once and I was hooked. I never imagined fruit at bottom + yogurt on top can be such a delicious indulgence. From then onwards, I bought atleast 10 of these yogurt cups each week, on an average to eat one every day and rest of the three when I crave for more. This went on for couple of years until I moved out of Virginia in the summer of 2010.
 |
| ..this was my favorite go-to-snack whenever I am low & need some pep up..and it always worked! |
 |
| ...I miss you Trader Joes...:-( |
Enjoy..

 |
| ...plums...oh..you..luscious plums.. |
 |
| ..cornstarch water being added to cooked,mushy fruit.. |
 |
| plum compote... I have saved some for my toasted bread in tomorrow's breakfast.. |
 |
This is Recipe 19 for my The 100 Recipe Challenge for Year 2013. Check out the rest of the recipes posted so far...
Be the first one to know what I am going to post next by "Liking" Cooking With Siri page on Facebook and follow me on twitter.
until next recipe,

February 7, 2010
Fried Cauliflower Curry
..the moment I came to know that Jaya has extended the deadline for her 'repost event', I was all excited & ready to try my first recipe, ever posted on my blog 'the Vaangi Ulli Theeyal'. Truth to be said, when I tried my hand the first time on this recipe, I was not impressed with the outcome. Yes, the taste was good & edible but there was no 'W.O.W' factor involved.
..I wanted to get that this time..so the next thing I did was - I researched and finally landed on Sig's blog - 'Eggplant Theeyal'. and was truly impressed!...my motto was to get the 'brown sauce' she mentioned in her post.
...well the result is below -
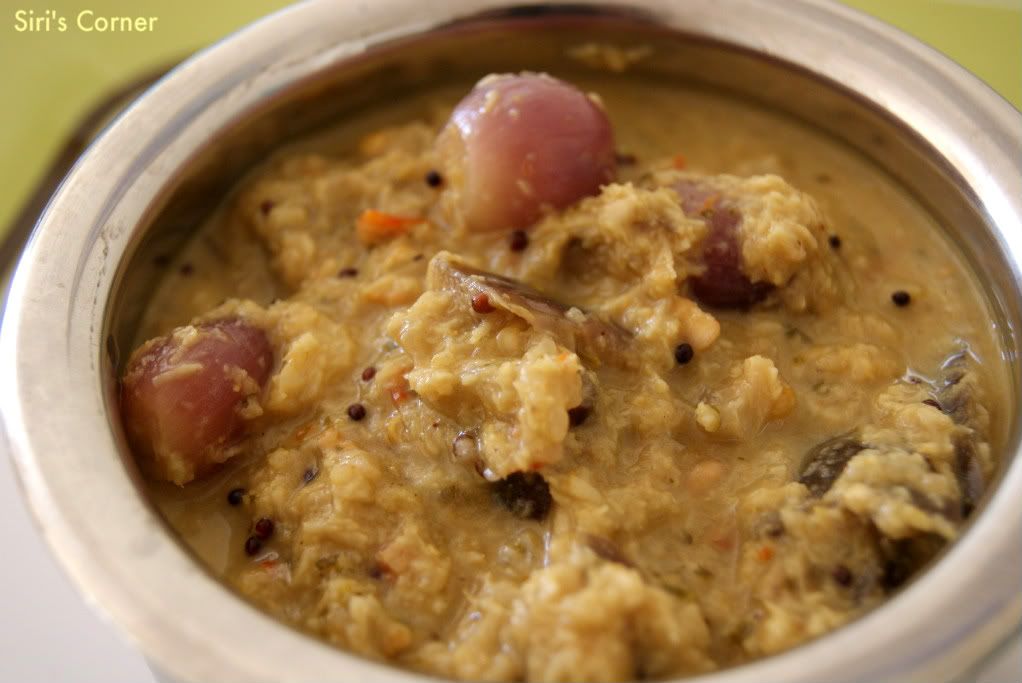
..no brownness as expected becoz - I added too much of coconut! :(.. I love grated coconut in gravy-based dishes, so out of that habit, I added I guess a tad bit more than expected. I was too depressed to even blog about it but the verdict my roomies gave while their taste-testing was very encouraging. They loved it! C'mon who doesn't love coconut. :).. So, I am happy now..am gonna try this again, add 'right amount' of roasted coconut with spices & get the 'brown sauce' into it! :-).
..and as many of you all know, we had a very heavy spat of snow from past two days here in DC area. Normally I love snow but I hate anything 'too much of it'..:(.. All of us were literally stuck at home and thank goodness we did our errands on Friday itself!

..in such depressing times, our minds automatically trigger for some serious 'indulging & comforting food' and my roomie, P made one such dish. As per her, there was no particular name for this, so we came up with one - 'Fried Cauliflower'. Paired with some simple Jeera rice & above Theeyal on the side, it was pure heaven! Thank you P for brightening our long, boring, snowy days with this awesome recipe. :)
P says - She was asked to make this dish for almost every potluck party until now and it is always gone in minutes!..After tasting this, I am not-at-all surprised by that! :-)
Hope you all have a wonderful week ahead!
Chao,

..I wanted to get that this time..so the next thing I did was - I researched and finally landed on Sig's blog - 'Eggplant Theeyal'. and was truly impressed!...my motto was to get the 'brown sauce' she mentioned in her post.
...well the result is below -
..no brownness as expected becoz - I added too much of coconut! :(.. I love grated coconut in gravy-based dishes, so out of that habit, I added I guess a tad bit more than expected. I was too depressed to even blog about it but the verdict my roomies gave while their taste-testing was very encouraging. They loved it! C'mon who doesn't love coconut. :).. So, I am happy now..am gonna try this again, add 'right amount' of roasted coconut with spices & get the 'brown sauce' into it! :-).
..and as many of you all know, we had a very heavy spat of snow from past two days here in DC area. Normally I love snow but I hate anything 'too much of it'..:(.. All of us were literally stuck at home and thank goodness we did our errands on Friday itself!
..in such depressing times, our minds automatically trigger for some serious 'indulging & comforting food' and my roomie, P made one such dish. As per her, there was no particular name for this, so we came up with one - 'Fried Cauliflower'. Paired with some simple Jeera rice & above Theeyal on the side, it was pure heaven! Thank you P for brightening our long, boring, snowy days with this awesome recipe. :)
P says - She was asked to make this dish for almost every potluck party until now and it is always gone in minutes!..After tasting this, I am not-at-all surprised by that! :-)
Hope you all have a wonderful week ahead!
Chao,

November 10, 2007
Can This Recipe Be Saved Contest - 'Thai Rice and Bean Croquettes'
"Can This Recipe Be Saved Contest" is a one-of-kind event initiated by Susan of 'FatFree Vegan Kitchen' where she asked us to use our creativity and save her 'Thai Croquettes' which were originally made by pumpkin...:)
.... and here in my version, I made use of Red Kidney Beans and Rice instead of pumpkin and also made few additions to satiate my tastebuds.
Thanks to Nupur, as I got to know about such an event from her post where she made the some yummy "Thai Eggplant Croquettes."
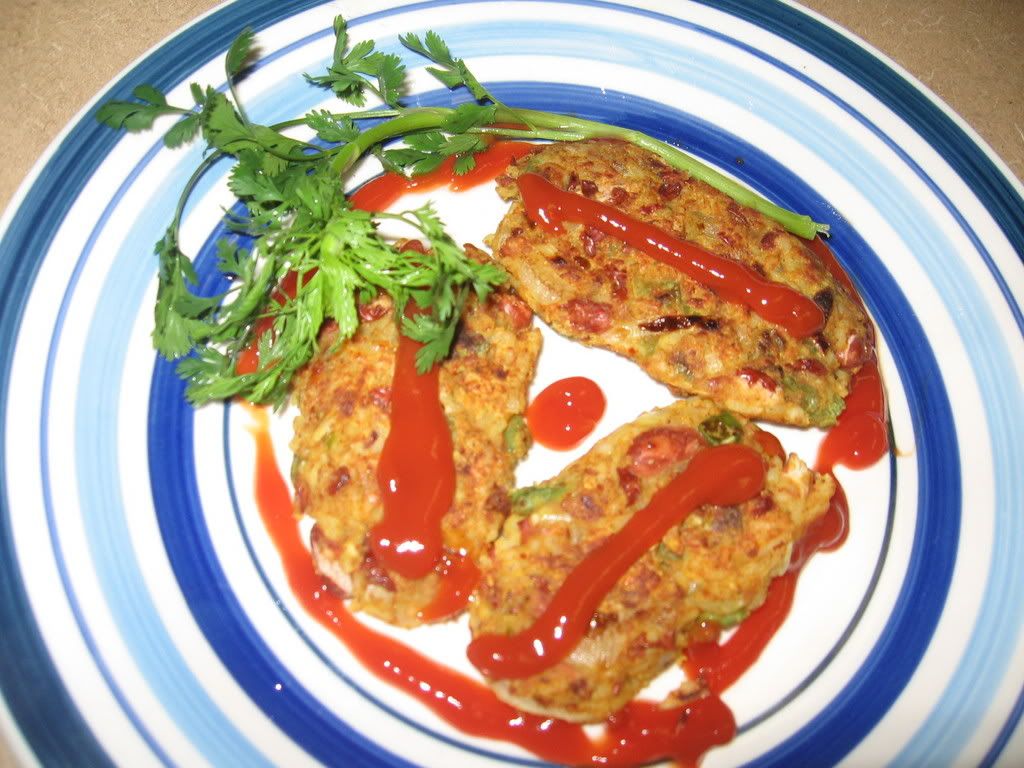
Thai Style Red Bean and Rice Croquettes
-----------------------------------------------------
Ingredients:
1/2 cup pre-cooked sliced beans
1 cup Red Kidney Beans ( I used canned!!)
1/2 cup (White/Brown) Rice ( I used White..)
3 tbsp Soya Sauce
1 tbsp Thai Red Curry paste
1/2 medium Onion - finely chopped
Salt - to taste
1/4 tbsp BlackPepper
2 tbsp Cornflour
1 tbsp flax seed
1 tbsp Lemon Zest ( I used 1 tbsp of lemon juice..)
1/2 tbsp sugar (optional)
Oil - to shallow fry
Preparation:
1. Place the green beans, Red kidney beans and half the rice into a food processor and pulse to chop coarsely (do not puree!).If you have a small processor, you may have to do this in batches. Pour into a bowl and add all remaining ingredients.
2. Mix the contents well. Add very little water if needed.
3. Make small cylindrical shaped patties (or any shape) and shallow fry both the sides on a hot skillet with little oil. Instead, we can even bake in the oven at 425F.
4. Serve with Susan's yummy Thai Sweet and Sour Dipping Sauce.
I served these with my favorite tomato ketchup instead...:)
November is 'Vegan Month of Food' and dear Suganya is organising an one-off event - "Vegan Ventures".
Off these 'Thai Rice and Bean Croquettes' go to Suganya's event too.
Click here to find out who all are participating in 'VeganMoFo' Event.
.... and here in my version, I made use of Red Kidney Beans and Rice instead of pumpkin and also made few additions to satiate my tastebuds.
Thanks to Nupur, as I got to know about such an event from her post where she made the some yummy "Thai Eggplant Croquettes."
Thai Style Red Bean and Rice Croquettes
-----------------------------------------------------
Ingredients:
1/2 cup pre-cooked sliced beans
1 cup Red Kidney Beans ( I used canned!!)
1/2 cup (White/Brown) Rice ( I used White..)
3 tbsp Soya Sauce
1 tbsp Thai Red Curry paste
1/2 medium Onion - finely chopped
Salt - to taste
1/4 tbsp BlackPepper
2 tbsp Cornflour
1 tbsp flax seed
1 tbsp Lemon Zest ( I used 1 tbsp of lemon juice..)
1/2 tbsp sugar (optional)
Oil - to shallow fry
Preparation:
1. Place the green beans, Red kidney beans and half the rice into a food processor and pulse to chop coarsely (do not puree!).If you have a small processor, you may have to do this in batches. Pour into a bowl and add all remaining ingredients.
2. Mix the contents well. Add very little water if needed.
3. Make small cylindrical shaped patties (or any shape) and shallow fry both the sides on a hot skillet with little oil. Instead, we can even bake in the oven at 425F.
4. Serve with Susan's yummy Thai Sweet and Sour Dipping Sauce.
I served these with my favorite tomato ketchup instead...:)
November is 'Vegan Month of Food' and dear Suganya is organising an one-off event - "Vegan Ventures".
Off these 'Thai Rice and Bean Croquettes' go to Suganya's event too.
Click here to find out who all are participating in 'VeganMoFo' Event.
Subscribe to:
Posts
(
Atom
)

